
Create a booking in 4 clicks
Questi contenuti non sono ancora disponibili nella tua lingua.
| Why | Take a booking over the phone and pin a room to the guest without leaving the grid. |
| Who | Front desk staff and administrators who take bookings. |
| What you’ll get | A booking on the grid in four clicks: dates and the room are filled in from the grid; the creation wizard consists of two screens — “Booking” and “Confirmation”. |
| Limitations | The numbers on the screenshots are demo data. Four clicks is the path for a typical booking whose dates and room come from the grid; a detailed booking (agencies, extra services, day-by-day meals, payments) takes longer to fill in. |
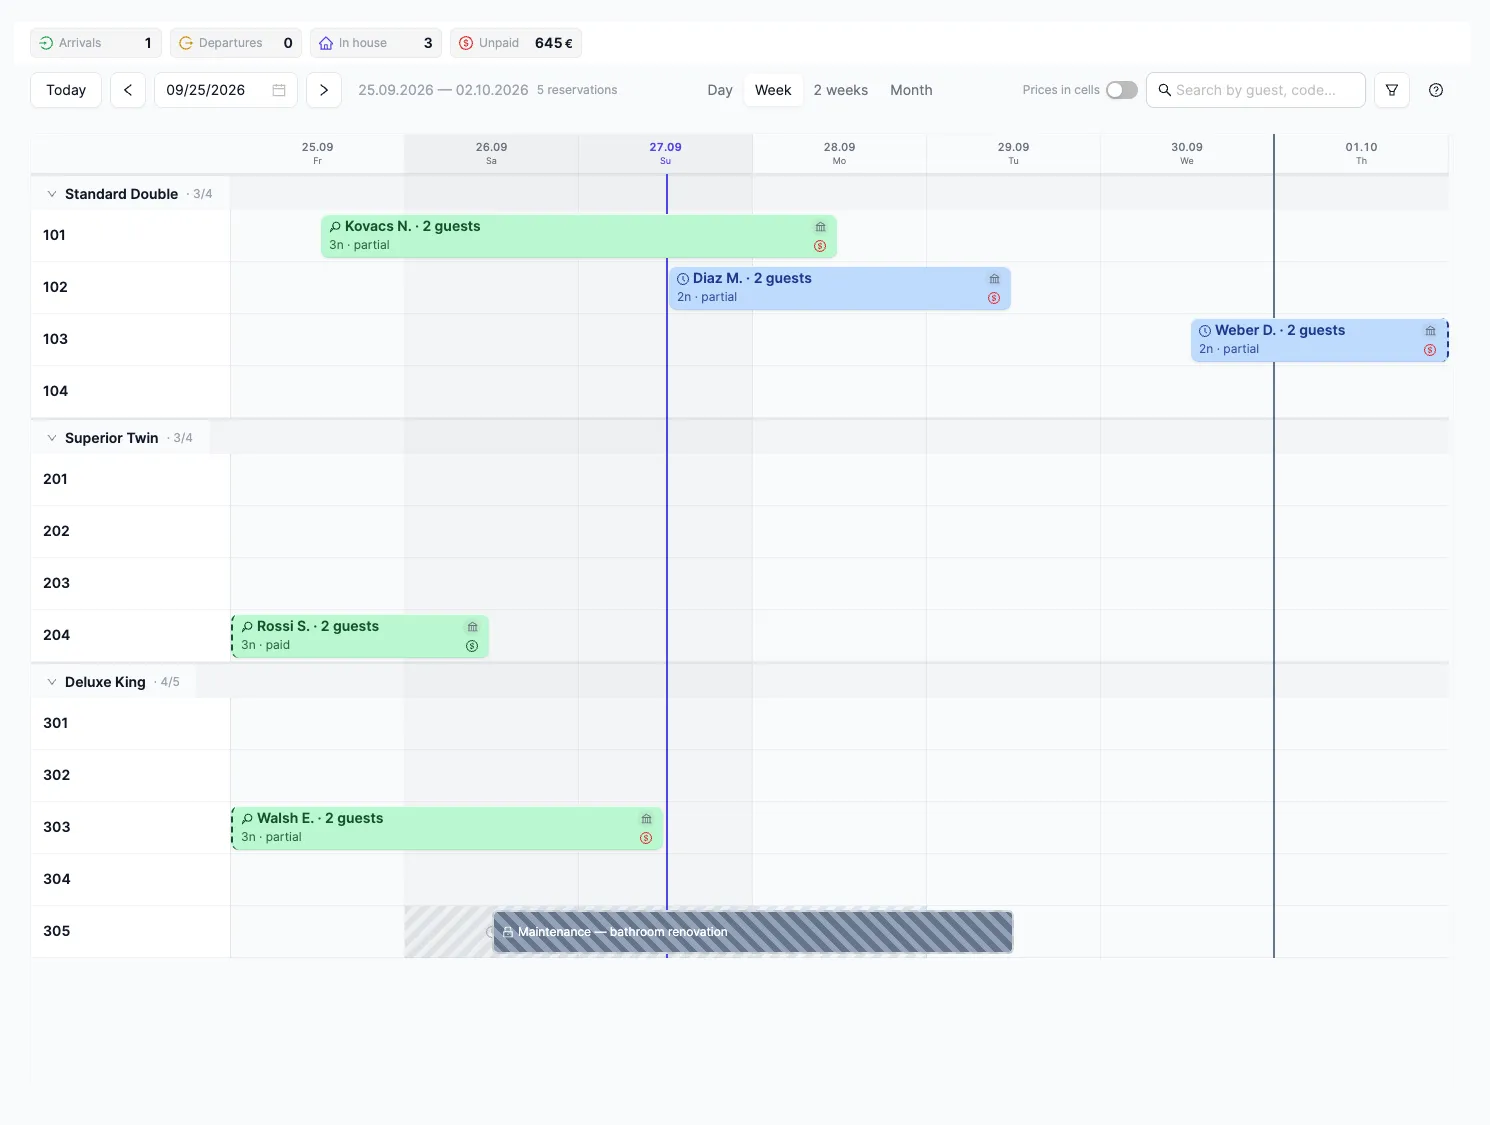
A guest calls — and the front desk places the booking straight onto the grid. Clicking an empty cell of the Planner, or dragging along a room row for several days, opens the booking form with the dates and room already filled in. The second entry point is the “New Reservation” button on the Reservations page: the same wizard, with the dates and room picked right in the form. Either way, all that is left is to name the booker and confirm.
“Four clicks” means four actions: pick the dates, pick the room, fill in the booking, confirm. The creation wizard itself has two screens: “Booking” and “Confirmation”.
Step 1. Pick the dates on the grid
Section titled “Step 1. Pick the dates on the grid”- Open the Planner in the left menu.
- Click an empty cell in the row of the room you need, on the arrival date — or drag the selection along the row for the whole stay, two or three days for example: the check-in and check-out dates are filled in at once.
- The booking form opens: the check-in and check-out dates are already in place, and the number of nights is calculated.
Result: the “New Reservation” form is open, and the stay dates are filled in from the grid.
Without the grid: the same wizard opens with the “New Reservation” button on the Reservations page. There, the check-in and check-out dates are picked in the form itself, and the room at step 2; the remaining steps are the same.
Step 2. Pick the room
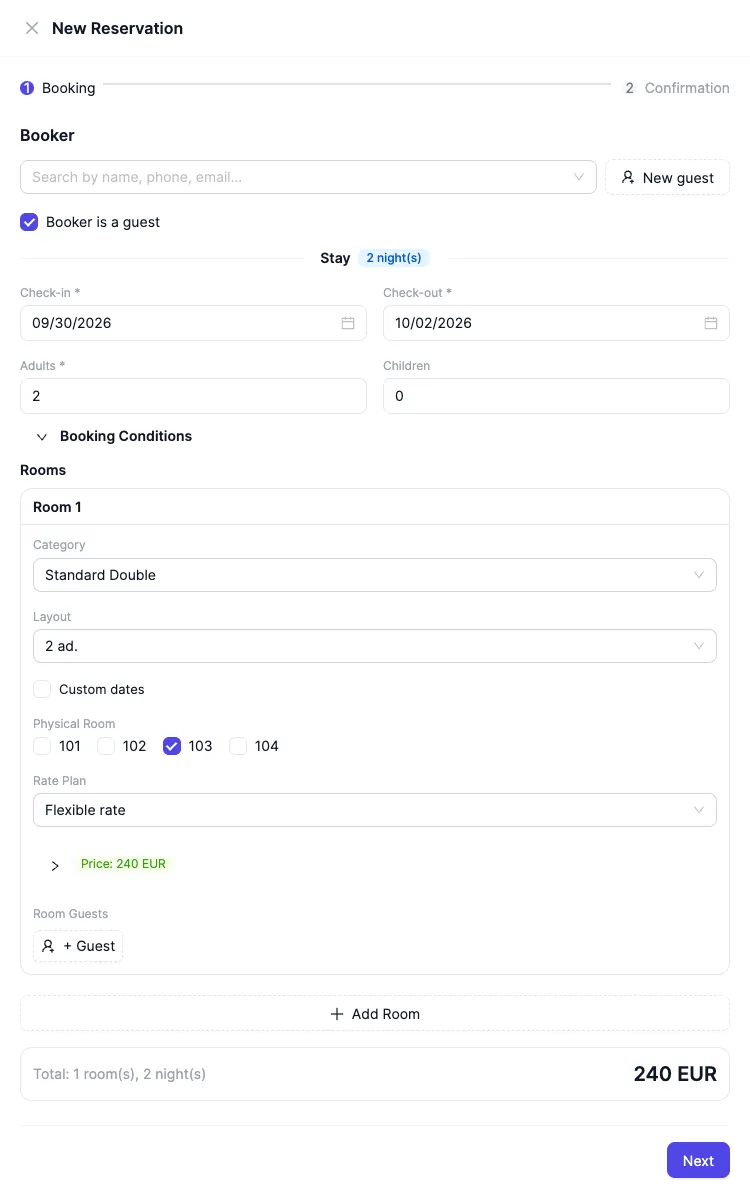
Section titled “Step 2. Pick the room”The room is filled in from the cell you clicked or dragged across. Check it in the “Rooms” block:
- Look at the category and the occupancy option — for example, “2 ad.”.
- Make sure the right physical room is ticked: the free rooms of the category are listed next to it.
- If the booking covers several rooms at once, add them with “Add Room” — each gets its own guests and rate plan.
- Look at the total line at the bottom of the form: the number of rooms, nights, and the amount are recalculated on the fly with every change.
Result: the booking carries a specific room, and the amount is visible before anything is saved.
Step 3. Fill in the booking
Section titled “Step 3. Fill in the booking”On the “Booking” screen:
- Find the booker by searching by name, phone, or email — or create a new guest with the “New guest” button. If the booker will be staying themselves, tick “Booker is a guest”.
- Check the party makeup: adults and children.
- If needed, open “Booking Conditions” — this is where the status, source, meal plan, and cancellation policy are set.
- Move on to the “Confirmation” screen.
Result: the “Booking” screen is filled in — the booker is found or created, and the party makeup and conditions are set.
Step 4. Confirm the booking
Section titled “Step 4. Confirm the booking”- On the “Confirmation” screen, review the booking summary.
- Confirm the creation.
Result: the booking is created and appears on the grid — as a bar in the row of the selected room, on the selected dates.
Booking statuses
Section titled “Booking statuses”The status is set under “Booking Conditions” when the booking is created and changed later in the booking card. What each of the six statuses means and when to use which — in Booking statuses: the six states; changing and canceling — in Change or cancel a booking.
What’s next
Section titled “What’s next”- The booking card. It gathers everything about the booking — from rooms and guests to payments, the rate plan, the cancellation policy, services, meals, documents, and the change history.
- The guest profile. A profile with contact details, booking history, and files — handy when a returning guest calls again.
- Check the guest in. The booking is on the grid — how to walk the guest into the room: Check-in and check-out.
- Change or cancel. Move the booking to other dates or another room, or cancel it: Change or cancel a booking.
- A booking for several rooms. How multi-room bookings are added and how the total is counted: Multi-room bookings and groups.
See also
Section titled “See also”- The Planner: how it works — arrivals, departures, and occupancy on one screen.
- Guests — guest profiles and stay history.