Launch checklist: from account setup to your first check-in
Цей контент ще не доступний вашою мовою.
| Why | Launch your hotel in order — from the property profile to the first checked-in guest, without skipping the step people usually stumble on. |
| Who | New hotels; owner-operators without an IT specialist. |
The path from an empty property to the first check-in takes one or two days of working together with support. Help with onboarding is optional: the checklist can be completed on your own — with support it is faster, and support is there at every step.
Step 1. The property profile
Section titled “Step 1. The property profile”- Open “Settings” in the left menu.
- Fill in the hotel profile: name, address, contact details.
- Set up taxes and city fees right there — from then on they are added to stays automatically; there is no need to add them to each booking by hand.
Result: the property has a name and an address, and taxes are calculated on their own.
Step 2. The room inventory
Section titled “Step 2. The room inventory”- Open “Rooms” in the left menu.
- Create room categories — for example, “Standard” and “Suite”: rate plans and prices are attached to categories.
- Inside the categories, add the physical rooms: at check-in the guest receives a specific room, not an abstract category.
Result: the property structure is in place — from the category down to the specific room.
Step 3. First rate plans and prices
Section titled “Step 3. First rate plans and prices”- Open “Rates” and create your first rate plan: the price, the meal type, and the cancellation policy are set there.
- Attach the rate plan to the room categories.
- Set the prices in the “Price Manager”: by editing a cell for a specific date, or with a bulk update for a period.
Learn more → Rate plans: how they work, Change prices: one date or in bulk.
Step 4. A test booking
Section titled “Step 4. A test booking”- Open the Planner and click an empty cell in the row of the room you need, on the arrival date — or drag across a date range.
- Fill in the booking and confirm: the form fills in the dates and the room for you.
- Experiment with the statuses and with cancellation — the room becomes free again.
Nothing will go out to the channels — they are not connected yet. This is a practice booking inside your own PMS.
Step 5. The widget on your website
Section titled “Step 5. The widget on your website”- Open the “Online booking” section and go to the “Embed code” page.
- Copy the widget code — two lines.
- Paste them into the website page where the search block should appear: the guest picks the dates and the room and pays without leaving your site.
Learn more → Booking Engine.
Step 6. Your first channel
Section titled “Step 6. Your first channel”We recommend starting with Booking.com. Open “Channel Manager” and click “Add channel”: find the channel by searching for its name, enter the property ID from the channel’s own account, and map the categories and rate plans. Right after the mapping is saved, prices and availability travel to the channel on their own, and the channel’s bookings start arriving in the Planner.
Learn more → Channel Manager.
Step 7. The first check-in
Section titled “Step 7. The first check-in”The hotel day starts on the dashboard: today’s arrivals and departures, who is currently in the hotel, and how many rooms are free — on one screen; the “Needs attention” block highlights the day’s alerts, such as unpaid arrivals.
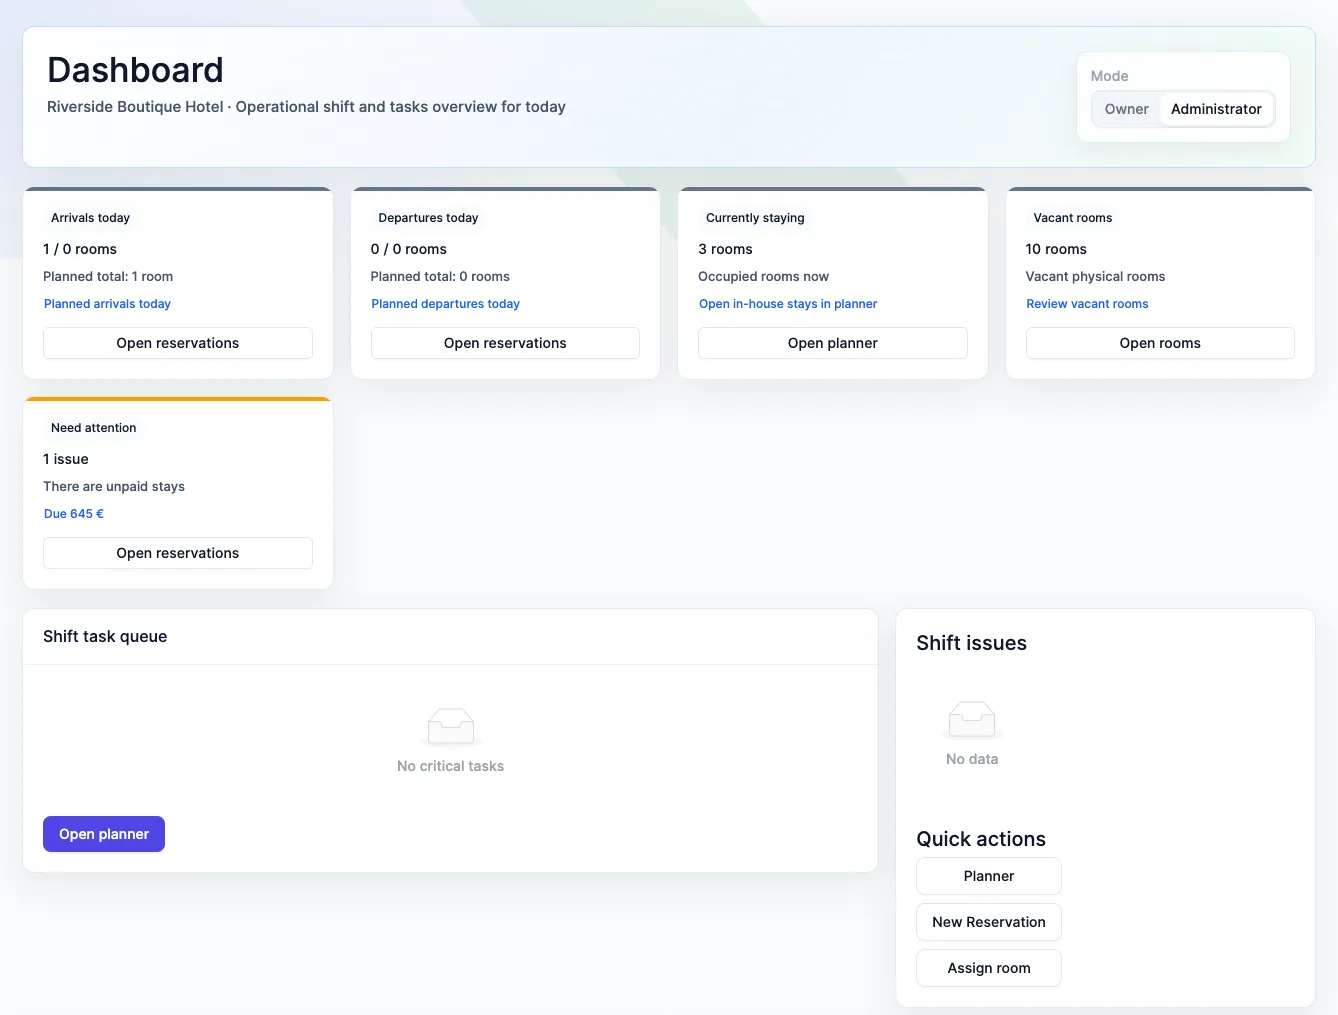
When the guest arrives, check them in from the Planner — one or two clicks, the room is assigned in advance. When a booking is created, the guest is automatically sent a voucher: an HTML preview that the browser prints. The day is closed by a cashier shift: money movements are recorded in the journal.
You are live
Section titled “You are live”The profile is filled in, rooms and prices are in place, the website is selling, the channel is connected, and the first guest is checked in. From here the system takes over the routine: price and availability changes travel to the channels on their own, bookings arrive in the Planner, and alerts remind you of what needs a reaction.
What to explore next
Section titled “What to explore next”- The Planner: how it works — the hotel’s main working screen: arrivals, departures, and occupancy on one screen.